Ubuntu 20.04 Docker MMDetection 환경구성
mmdetection 는 open-mmlab 에서 개발한 computer vision 프레임워크 이다. 다양한 알고리즘 모델을 쉽게 사용할 수 있도록 미들웨어와 관련 도구를 제공한다. 이 글은 Ubuntu 20.04 에서 docker 를 이용하여 mmdetection 설치하고, 간단한 데모를 수행하는 과정을 설명한다.
테스트환경
- Ubuntu 20.04.5 LTS
- NVIDIA GeForce RTX 3050 Ti Laptop GPU
- NVIDIA-SMI 515.86.01
사전작업
NVIDIA 그래픽 카드 드라이버 설치
도커를 이용하여 MMDet 을 설치하기
Docker 설치
우분투 20.04 Docker 설치는 makepluscode 의 이전 글을 참고한다.
2021.12.01 – [기타/Linux] – [우분투] Docker 설치하기
MMDetection Docker 이미지 빌드
open-mmlab 의 mmdetection github 를 복제한다.
git clone https://github.com/open-mmlab/mmdetection.git
mmdetection 에는 Dockerfile file 이 포함되어있다. 아래와 같이 호스트 환경에 맞게 Dockerfile 을 수정하였다.
ARG PYTORCH="1.9.0"
ARG CUDA="11.1"
ARG CUDNN="8"

FROM pytorch/pytorch:${PYTORCH}-cuda${CUDA}-cudnn${CUDNN}-devel

ENV TORCH_CUDA_ARCH_LIST="8.6"
ENV TORCH_NVCC_FLAGS="-Xfatbin -compress-all"
ENV CMAKE_PREFIX_PATH="$(dirname $(which conda))/../"

# To fix GPG key error when running apt-get update
RUN apt-key adv --fetch-keys https://developer.download.nvidia.com/compute/cuda/repos/ubuntu1804/x86_64/3bf863cc.pub
RUN apt-key adv --fetch-keys https://developer.download.nvidia.com/compute/machine-learning/repos/ubuntu1804/x86_64/7fa2af80.pub

RUN apt-get update && apt-get install -y ffmpeg libsm6 libxext6 git ninja-build libglib2.0-0 libsm6 libxrender-dev libxext6 \
    && apt-get clean \
    && rm -rf /var/lib/apt/lists/*

# Install MMCV
RUN pip install --no-cache-dir --upgrade pip wheel setuptools
RUN pip install mmcv-full==1.7.1 -f https://download.openmmlab.com/mmcv/dist/cu111/torch1.9.0/index.html

# Install MMDetection
RUN conda clean --all
# RUN git clone https://github.com/open-mmlab/mmdetection.git /mmdetection
WORKDIR /mmdetection
ENV FORCE_CUDA="1"
# RUN pip install --no-cache-dir -r requirements/build.txt
# RUN pip install --no-cache-dir -e .
- 호스트 환경의 그래픽카드 (GeForce RTX 3050) 에 맞게 CUDA, CUDNN, Pytorch 버전을 수정한다.
- 호스트 환경의 mmdetection git 을 Docker 에서도 사용하기 위해 git 생성하는 부분은 제거한다.
작성된 Dockerfile 을 빌드하여 이미지를 생성하자.
docker build -t mmdetection .
MMDetection Docker 실행
아래의 명령어로 생성된 Docker 를 실행한다. -v 옵션을 이용하여 mmdetection 디렉토리를 마운트한다.
docker run --rm -it --ipc=host --net=host --gpus all -v $(pwd):/mmdetection mmdetection
실행 후, 호스트 환경의 mmdetection 디렉토리가 Docker 내부에 마운트 된 것을 확인한다. pip install 를 사용하여 필요한 패키지를 설치한다.
pip install --no-cache-dir -r requirements/build.txt
pip install --no-cache-dir -e .
MMDetection demo 실행
- MMDetection demo 를 실행하기 위해 checkpoint 파일을 다운로드 하여 checkpoint 디렉토리에 저장한다.
- 아래 demo.py 코드를 작성한다.
from mmdet.apis import init_detector, inference_detector

config_file = 'configs/faster_rcnn/faster_rcnn_r50_fpn_1x_coco.py'
checkpoint_file = 'checkpoint/faster_rcnn_r50_fpn_1x_coco_20200130-047c8118.pth'

device = 'cuda:0'

model = init_detector(config_file, checkpoint_file, device=device)

img = 'demo/demo.jpg'
result = inference_detector(model, img)

model.show_result(img, result, out_file='result.jpg')
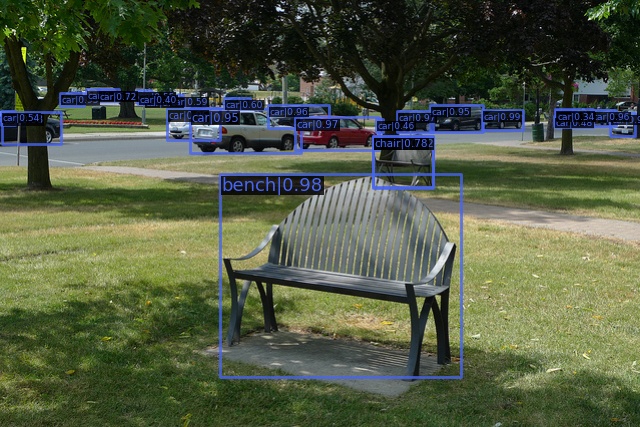
python 명령어로 demo.py 를 실행하면 mmdetection 이 수행되고 아래의 result.jpg 파일이 생성된다.


